Tuning
Every variable carries an in-editor tooltip, so this page covers only the handful of rules that actually matter. Get these right and the rest is fine on defaults.
Set density per volume
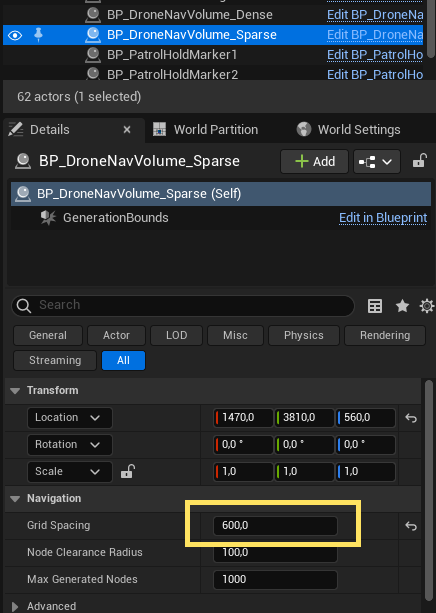
There's no global config asset to assign — you set density directly on each BP_DroneNavVolume by choosing a GridSpacing. Recommended starting points:
| Scenario | Grid Spacing | derived Max Connection Distance | Use for |
|---|---|---|---|
| Indoor / dense | 200 | 380 | Tight interiors, corridors |
| Balanced | 350 | ~665 | Mixed levels |
| Outdoor / sparse | 600 | 1140 | Large open spaces |
MaxConnectionDistance is derived, not authored — each volume computes it as GridSpacing × ConnectionDistanceRatio (ratio defaults to 1.9) and shows it read-only. You only pick GridSpacing.
Because density lives on the volume, different volumes can use different densities in the same level — a dense indoor volume can sit right against a sparse outdoor one, and the graph stitches them together (each node links at its own volume's reach). Set the spacing, then bake.
There's nothing to keep "in sync" across volumes — drop a small dense volume over a cluttered area and a big sparse one over open space, and bake. The connection step handles the seam where they meet.
Baking builds the whole graph in a single Blueprint pass, which is subject to Unreal's Maximum Loop Iteration Count safety limit (default 1,000,000). A large volume at a fine GridSpacing can produce enough nodes to trip it, aborting the bake with a "Runaway loop detected" error. The bake warns you up front when it estimates you're near the limit, so watch the output log.
If you hit it, raise the limit: Project Settings → Engine → General Settings → Maximum Loop Iteration Count (or type "Maximum Loop Iteration Count" into the Project Settings search), set it to 10,000,000 or higher, and re-bake. Coarsening GridSpacing or splitting one huge volume into a few smaller ones also works — see Troubleshooting.
The two rules that matter
1. Clearance = agent radius + margin
TraceRadius (manager) and NodeClearanceRadius (volume) decide how much empty space a node/edge needs. Set them to your drone's collision radius plus a corner-safety margin of ~25–30 units — not just the agent radius.
Why the margin: path smoothing pulls the route tight against this clearance boundary at convex corners. If clearance == agent radius, the drone scrapes corners. For a ~75-radius drone, ~105 works well.
Keep TraceRadius and NodeClearanceRadius equal, and re-bake after changing them. These are properties of the drone, not the level, so they're identical on every volume.
2. Connection distance is derived — you can't break it
Connectivity needs MaxConnectionDistance ≥ GridSpacing × 1.732 (the √3 floor) — but you no longer set it by hand. Each volume derives it:
MaxConnectionDistance = GridSpacing × max(ConnectionDistanceRatio, 1.732)
The ratio defaults to 1.9 (inside the recommended 1.7–2.0 band) and is clamped to a minimum of 1.732, so the floor can never be violated — the old "fragmented graph from a bad ratio" failure is gone by construction. You'd only touch ConnectionDistanceRatio to deliberately push the band; raising it links more distant neighbours (denser graph, slower bake), lowering it can't go below the floor.
After baking, still glance at the isolated-node warning in the log and confirm connectivity with Show Nav Graph.
Scale is supported (roughly uniform)
You can scale a BP_DroneNavVolume actor and connectivity stays correct — the derived MaxConnectionDistance is multiplied by the actor's scale, so scaling a volume trades node density for area rather than fragmenting it. This assumes roughly uniform scale; for precise control, prefer resizing via the box extent. (The box is the actor's root, so you move/rotate the actor to place the region — you can't drag the box out of alignment with it.)
Other knobs worth knowing
AcceptanceRadius(follower) — how close counts as "arrived." Set it to roughly the drone's body bounds (~100). Smaller and the planner threads the drone through gaps narrower than its body, and it wedges.MoveSpeedChase/MoveSpeedPatrol— pursuit vs patrol cruise speeds.MaxAcceleration— lower = heavier, more inertial feel; higher = snappier.- Avoidance (
AvoidanceProbeDistance/AvoidanceStrength) — reactive steering around obstacles between waypoints; defaults are sane.
Everything else is documented in the tooltips on each variable — and the Blueprint Reference lists the key properties per blueprint at a glance.